
Correct piston ring installation requires confirming the ring set model, installation order, orientation, end gap, ring groove fit, and cylinder condition. This guide explains how to install piston rings sets correctly to help prevent low compression, blow-by, excessive oil consumption, broken rings, and cylinder damage.
Piston ring and engine designs vary, so all clearances, orientations, and ring gap positions must follow the ring manufacturer’s instructions and the engine service manual.
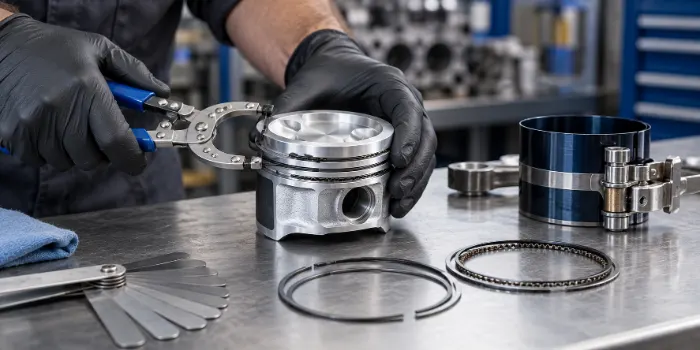
What Tools Are Required to Install Piston Rings?
The following tools and materials are recommended before installation:
Piston ring expander
Piston ring compressor
Feeler gauge
Ring groove cleaning tool
Piston ring end-gap filing tool, only for ring sets that permit adjustment
Clean engine oil or the specified assembly lubricant
Lint-free cleaning cloth
Engine service manual
Piston ring manufacturer’s instructions
First, confirm that the piston, piston rings, and cylinder specifications match, including the bore diameter, piston size, ring groove width, and ring thickness. Piston rings that look similar may have different profiles, coatings, and installation orientations and must not be interchanged.
Do not use a screwdriver, wire, or another sharp tool to pry compression rings into place. Doing so may deform or break the ring or damage the piston surface.
1. Identify the Piston Ring Types and Orientation
A common four-stroke engine ring set typically includes a top ring, a second compression ring, and an oil control ring.
Top Ring
The top ring sits in the uppermost piston groove. Its primary function is to seal combustion pressure and transfer some heat from the piston to the cylinder wall. Some top rings have special coatings, barrel faces, or internal and external bevels and must not be interchanged with the second ring.
Second Compression Ring
The second ring provides supplementary sealing while scraping some excess oil from the cylinder wall. Its taper, step, or bevel usually requires a specific orientation. Installing it upside down may cause blow-by or increased oil consumption.
Oil Control Ring
The oil control ring regulates the oil film thickness on the cylinder wall and returns excess oil to the crankcase through the oil drain holes. A common three-piece oil ring consists of one corrugated expander and two rails.
For rings marked with “TOP,” letters, numbers, or a manufacturer’s symbol, the marked side usually faces the piston crown. An unmarked ring must be oriented according to its profile, bevel, and the packaging diagram rather than by appearance alone.
2. Clean and Inspect the Piston and Cylinder
Before installation, thoroughly remove carbon deposits, sludge, and metal debris from the ring grooves. Do not scratch the groove bottom or side faces, and do not enlarge the grooves through excessive abrasion.
Inspect the following areas:
Ring grooves for wear, deformation, or burrs
Ring groove bottoms for carbon deposits
Piston oil drain holes for cleanliness and unrestricted flow
The piston for cracks, burning, or severe scoring
Piston rings for breakage, distortion, or coating loss
Cylinder walls for scoring, ridges, or abnormal wear
Cylinder taper and out-of-round against the service limits
If the cylinder or ring grooves are severely worn, replacing the piston rings alone will usually not restore a reliable seal. Further evaluation may be required to determine whether honing, boring, piston replacement, or another repair is necessary.
3. Measure the Piston Ring End Gap
The end gap is the distance between the two ends of a piston ring. It provides the space required for thermal expansion at operating temperature.
Measure the end gap as follows:
1. Place each piston ring in the specific cylinder in which it will be used.
2. Use an inverted piston to push the ring to the measurement depth specified by the manufacturer.
3. Make sure the ring is square to the cylinder bore.
4. Use a feeler gauge to measure the gap between the ring ends.
5. Compare the result with the ring set instructions or engine service manual.
In a used engine block, the cylinders may have different levels of wear. Each ring should therefore be measured in its corresponding cylinder rather than checking only one bore.
If the end gap is too small, the ring ends may butt together as the engine heats up, causing ring breakage, ring groove damage, or cylinder scoring. If the gap is too large, blow-by and oil consumption may increase.
End-gap requirements vary with bore diameter, ring material, operating temperature, and engine application. A single fixed value must not be applied to every engine.
Only piston rings specifically designed to allow end-gap adjustment should be filed. Use the correct tool, follow the manufacturer’s specified filing direction and removal amount, and lightly deburr the finished edges. Do not modify pre-gapped rings or rings with special coatings unless the manufacturer expressly permits it.
4. Check the Piston Ring Groove Fit
Place each piston ring in its corresponding groove, check the axial side clearance, and confirm that the groove bottom is clean and deep enough.
A conventional piston ring should move smoothly in its groove without excessive looseness and without contacting the groove bottom. Insufficient side clearance may cause the ring to stick as it heats up. Excessive side clearance can reduce sealing stability and increase impact and wear between the ring and groove.
If the side clearance is outside the specified range, determine whether the ring thickness is incorrect or the piston ring groove is worn. Two-stroke piston rings with locating pins must not be checked in the same way as conventional freely rotating rings.
5. Install the Piston Rings in the Correct Order
For common four-stroke engines, the rings are usually installed from the bottom upward in the following order:
1. Oil control ring
2. Second compression ring
3. Top ring
Special ring sets must be installed according to the instructions supplied with the package.
Install the Oil Control Ring
For a three-piece oil ring, first install the corrugated expander in the oil ring groove. The expander ends must butt together correctly and must not overlap.
Next, install the lower rail and the upper rail. After installation, check the following:
Both rails are fully seated in the groove
The expander is not overlapped or twisted
The expander joint remains clearly identifiable
The oil ring assembly sits evenly
The piston oil drain holes remain open
Some expanders have colored markings at both ends. When the ends are correctly butted together, both markings should normally remain visible. If only one marking can be seen, the expander may be overlapped.
An overlapped expander increases the local thickness of the oil ring assembly, preventing the ring from compressing correctly, making the piston difficult to insert, and potentially causing serious oil-control problems.
Install the Second Compression Ring
Confirm the orientation of the second ring’s marking, bevel, or oil-scraping edge. Use a piston ring expander to open the ring only slightly, then place it smoothly into the second groove.
Expand the ring only enough to clear the piston crown. Do not spiral a compression ring down from the top of the piston, as twisting may cause distortion, fine cracks, or permanent deformation.
Install the Top Ring
After confirming the top ring profile, coating, and orientation, use the ring expander to install it in the uppermost groove. Avoid excessive expansion, which may alter the ring’s roundness and tension.
After installing all piston rings, confirm the following:
The ring set is in the correct order
All markings face the correct direction
Each ring is seated in its corresponding groove
None of the rings is twisted or damaged
Conventional piston rings move normally in their grooves
6. Position the Piston Ring End Gaps
The piston ring end gaps should not be concentrated on the same side of the piston. The top ring, second ring, upper and lower oil rails, and expander joint should be staggered according to the ring set instructions.
When positioning the gaps:
Do not align the top-ring and second-ring gaps
Do not align the upper and lower oil-rail gaps
Keep the expander joint separate from the oil-rail gaps
Avoid positions specifically prohibited by the manufacturer
Do not alter the gap position on rings with a locating feature
Different engines may specify different ring-gap angles and positions. No single fixed angle should be treated as a universal standard. Follow the piston ring packaging diagram or the OEM service manual.
Two-stroke piston rings may use locating pins. On these designs, the ring gaps must align with the locating features and must not be rotated freely.
7. Insert the Piston into the Cylinder
Before inserting the piston, apply the specified clean engine oil or assembly lubricant evenly to the piston, piston rings, piston pin, related bearing surfaces, and cylinder wall.
Follow these installation steps:
1. Confirm the installation direction of the piston and connecting rod again.
2. Check the order, orientation, and end-gap positions of all piston rings.
3. Fit the piston ring compressor evenly around the piston.
4. Confirm that every ring is compressed within the piston diameter.
5. Make sure the compressor sits flat against the engine block deck.
6. Keep the piston square to the cylinder bore.
7. Push the piston smoothly into the cylinder.
If the piston does not enter smoothly, stop immediately and inspect the compressor, oil-ring expander, and the position of each ring. Do not drive the piston in with heavy blows, as this may break a ring, damage a ring groove, or score the cylinder wall.
8. Inspect the Assembly After Installation
After the piston enters the cylinder, confirm that the installation process has not damaged the piston rings or related components.
Check the following:
The piston entered the cylinder smoothly
The piston and connecting rod face the correct direction
No new scratches are visible on the cylinder wall
No broken ring fragments or abnormal metal debris are present
The compressor and all other tools have been removed
The assembly area remains clean
After the connecting rod has been attached and tightened to the specified torque, slowly rotate the crankshaft as directed by the service manual and check for abnormal resistance, binding, or metal-to-metal contact.
If any clear abnormality is found, stop the assembly process and inspect the components again. Do not attempt to overcome the problem by forcing the crankshaft to turn.
Common Piston Ring Installation Mistakes
| Installation Mistake | Possible Consequence |
| Interchanging the top and second rings | Abnormal sealing and oil-scraping performance |
| Installing a compression ring upside down | Low compression, blow-by, or increased oil consumption |
| Overlapping the oil-ring expander ends | The oil ring cannot compress or control oil correctly |
| Failing to measure the end gap | Ring-end butting, ring breakage, cylinder scoring, or leakage |
| Concentrating all ring gaps in one area | Increased risk of blow-by during initial startup |
| Forcing rings into place with a screwdriver | Ring deformation, ring breakage, or piston damage |
| Overexpanding a compression ring | Changes in ring roundness and tension |
| Forcing the piston into the cylinder | Damage to the piston rings, ring grooves, or cylinder wall |
| Ignoring cylinder and ring-groove wear | New rings still fail to provide a reliable seal |
Frequently Asked Questions About Piston Ring Installation
Which Piston Ring Should Be Installed First?
On common four-stroke engines, the oil control ring is usually installed first, followed by the second compression ring and then the top ring. Special ring sets must follow the supplied instructions.
Which Way Should the TOP Mark Face?
The side marked with TOP, letters, numbers, or a manufacturer’s symbol usually faces the piston crown. Unmarked rings must be oriented according to the packaging diagram and ring profile.
Do Piston Ring Gaps Need to Be Staggered?
Yes. The compression-ring gaps, oil-rail gaps, and expander joint should generally be separated, but the exact angles and positions must follow the ring set instructions or OEM service manual.
Can Piston Rings Be Installed Without Special Tools?
It is not recommended. A piston ring expander reduces the risk of overexpanding or breaking compression rings, while a piston ring compressor helps insert the piston safely into the cylinder.
What Should You Do If the Piston Will Not Enter the Cylinder?
Check whether the compressor is tight, whether every ring is fully seated in its groove, whether the oil-ring expander is overlapped, and whether a ring gap is catching on the cylinder entrance. Do not force the piston in.
What Happens If a Piston Ring Is Installed Upside Down?
Incorrect orientation may cause low compression, blow-by, exhaust smoke, increased oil consumption, and cylinder wear. If an incorrectly installed ring is found, remove it and inspect it for distortion or damage.
Custom Piston and Engine Component Machining
Weldo provides CNC旋盤加工, milling, and multi-axis machining services for custom pistons, precision ring grooves, and related engine components manufactured to customer drawings. We support dimensional inspection and quality control from prototypes through production quantities. Submit your 2D drawings or 3D models for a DFM review and machining quotation.